Showing posts with label themed event. Show all posts

Thursday, November 1, 2012

Halloween Hands | School Goodies


Super fun Halloween treats for my daughter's class: 
  • medical gloves (the kind with no powder)
  • Five smarties for each
  • Three to five other candies
  • Halloween themed ring on the ring finger
  • Tied with a ribbon
  • Repeat 28 times! :-)

Tuesday, July 31, 2012

Baby Shower Pinwheels | Paper Crafting

My crafting life has been on hold awhile, it's a little bit sad.  I LOVE to be creative, but as is life, I have been preoccupied with other ventures. 

I was super excited to throw a little shower for a friend a few weeks ago.   She will be welcoming her thrid little one, her first BOY so I fel the occasion deserved a little celebration.  I took a few photos I might add later of the decor (I did a retro-book, ABC theme) but I wanted to share these sweet little pinwheels I made.  


I found the best way to make these is two (12 x 2.5 inch) strips of scored paper attached, folded into an accordian.  Then use hot glue to atttach circles in the middle on both sides.  Other adhesive worked at first, but by the morning they had come apart and I had to use some hot glue. 

Until next time...:-)

Tuesday, August 2, 2011

Fishy Themed Party: Part Three, Fishy Bar

The pièce de résistance and really the whole reason I was excited to do this party stemmed from the 'Fishy Bar' idea. 

Have you gone into any grocery store lately and seen the number of varieties of Pepperidge Farm Fish crackers?  It is really pretty crazy.  So, my idea was to have every single kind of fish crackers in the form of a bar and let each party-goer take home a sort of 'trail mix' of different fish crackers. 

To take the idea even further, I wanted to give each of the types of fish crackers a cute and 'fishy' name to go along with the theme of the party.  

For example: Rainbow Colored Fish became 'Rainbow Trout' and the 'Baby' variety of fish crackers became 'Guppies' :-) 

I even found this Fish shaped snack container and had John drill a hole through it.  I then stuck a dowel through the hole so I could use it as part of the display.


If I can find my list, I will come back and add the entire list of fish names I gave to the crackers.  I used twelve(!) varieties of the crackers and there were still more I could have chosen from. 

Monday, August 1, 2011

Fishy Themed Party: Part Two, Food


All of the food for the party had an orange, blue, or fish theme to it!  It was fun trying to think of things to have that fit into the parameters.

Drinks were orange and blue Gatoraide and Juicy Juice (we did have water too) 


The Menu:
  • Pinwheel Sandwiches - called "Sushi Sandwiches"
  • Turkey and cheese sandwiches cut into the shape of a fish with a cookie cutter (not pictured)
  • Chinese Chicken Salad - Oranges added
  • Orange-you-glad it's fruit salad (peaches, oranges, cantalope, mango + blueberries)
  • Orange and Blue Jell-o cups
  • Various Orange and Blue candies
  • Cheese it's (obviously orange)
  • Cheetos (again obviously orange) - not pictured
  • Blueberry yogurt-covered pretzles- not pictured 


Out of sheer luck and good timing, we were given this sno-cone machine to use at the party as well... even though all the syrups weren't blue and orange it was a great, unique addition to the party!  Thanks friend that lent it to us ;-)
And finally, my favorite orange and blue addition to both the menu and the decor... cupcakes

These were Funfetti cupcakes with homemade marshmallow frosting dyed blue.  The toppers were made using a cutout from my silhouette machine.

I thought they came out super cute!

Sunday, July 31, 2011

Fishy Themed Birthday Party: Part One, Banner


I was driving Claire to school one day when I had the idea for a Fishy Themed party to celebrate her fourth birthday.  By the afternoon I had completely planned the party on paper, nevermind that her birthday was six week away!  The pre-planning was really unlike me, but I do have to say it helped me keep my budget in check, know what I was looking for, and it gave me less stress the day of the party.  It also kept me from letting my imagination get the best of me and spreading myself too thin for a party... which I have a tendancy to do. 

Moral: Plan ahead.  It works!

Claire's Birthday falls the last week of June which is nearly always over 100 degrees where we live.  I thought the colors of blue and orange were great for a summer birthday and adding in the 'Fishy' aspect was a fun personal touch because Claire LOVES fish crackers! 


All of the decor had orange or blue included, it was actually pretty easy to find things to match the color scheme...

I made this paper penant banner using a few pieces of scrapbook paper I had on hand and my silhouette machine... it took one hour  exactly start to finish and I thought it looked absolutely adorable.  I strung it with some twine, which gave a nice touch. 


Wednesday, May 18, 2011

Cupcake Party: All in the Details

In an effort to wrap up the 'cupcake party' posts, here are a few of the details that I haven't mentioned yet.

  • I am a big fan of the FREE-to-download subway art found at eighteen25, this is a Birthday version
  • Small cupcake stands were made with plates and candlesticks found at the Dollar Store, then glued together and spray painted.  I have seen several tutorials for this.
  • Caraffe's seem to be popping up all over too!  I found these at Smart and Final as a set of two.  They are plastic and have a lid.   
  • I had grand plans of making this pennant banner, but my time started running a little short.  My wonderful friend Brooke swooped in and sewed several of them for me... and I am SO thankful!  She is much more detail-oriented that I am so I wouldn't have been able to pull them off as beautiful as she did!  BONUS: I can use them in the future or lend them out!! 
  • I kinda splurged a little on these paper straws from Sugar Diva.  I am a little bit obsessed with them.  We served pink (strawberry) milk, chocolate milk, and plain milk... so I felt the straws were such a cute addition!
  • And finally, I found this awesome idea in several places, but really liked the look of the Cupcake Garland tutorial found here, I was so sad to take it down after the party... it was just so pretty! 

So, there you have it!  Cupcake party fun!!

Tuesday, May 3, 2011

Cupcake Party: Cupcake Decorating Bar

As part of the on going saga that was my daughter's 6th birthday party, here is the next installment!
the Cupcake Decorating Bar

The idea was to have each child decorate two cupcakes... one they would take home and one they would have at the party.  I have to say, it worked pretty well... and I love the way it looked. 

Supplies/Ingredients:
  • Variety of Sprinkles... I had 6 different types found at a local cake decorating store
  • Chocolate and Vanilla frosting, portioned into individual sized cups
  • Vanilla frosting and food coloring, mix different colored frosting and add to smaller piping bags with fancy tips or decorating squeezers like the ones shown below (they are from Pampered Chef)
  • Cherries
  • Plastic spoons and Knives for spooning sprinkles and spreading frosting
  • To-go containers, preferably with a spot to put a name
  • Sticks or flags to add to the cupcakes to be eaten at the party
  • Premade cupcakes... I had 5 different types
The directions read:
Decorate 2 (cupcakes)...put 1 (cupcake) in a box to take home,
add a stick to the other one to eat at the party
The five types of cupcakes... they chose two
The birthday girl (on the right) decorating with a friend.
Completed cupcakes ready to be eaten at the party.
The to-go containers ready to go home with each of the party-goers!


Sunday, May 1, 2011

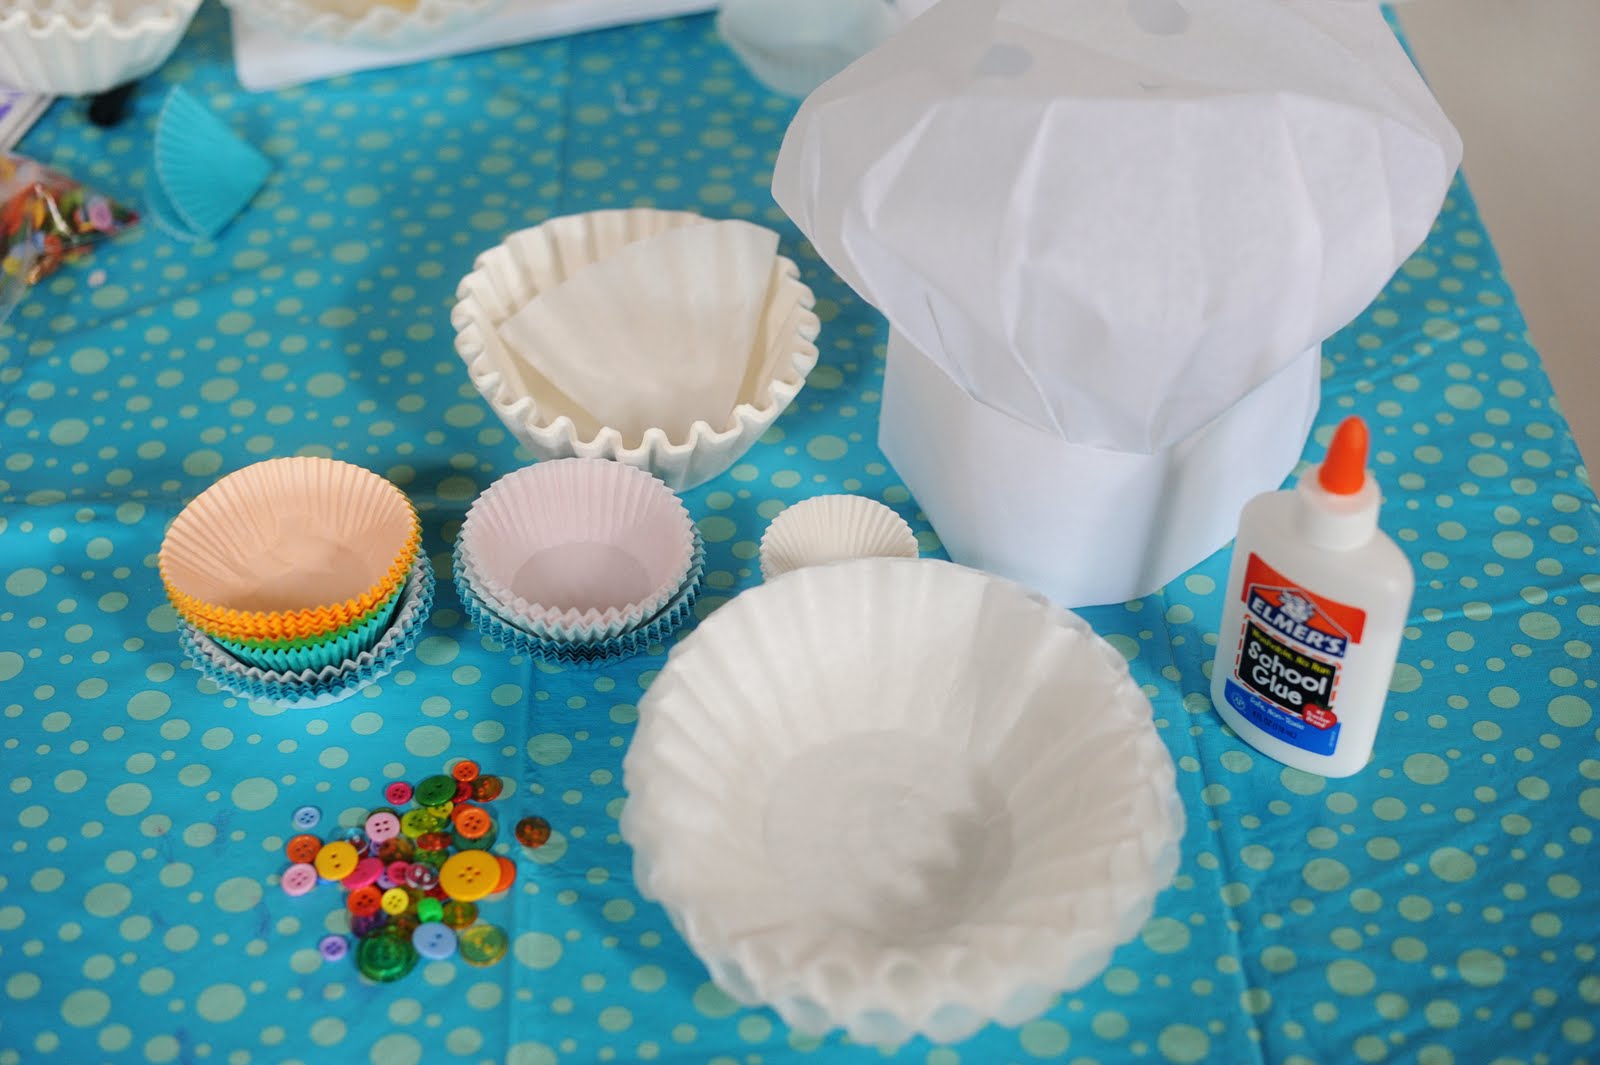
Cupcake Party: Chef's Hat with Coffee-Filter Flower


This is a craft the kids did at my daughter's recent cupcake birthday party!  The kids would be decorating cupcakes and making pizza, so a chef's hat fit right in with the cooking theme.

The Chef's Hats were found here.  I found them to be of decent quality, however they need to be stapled in the back once they are sized to the child's head.

I saw this idea for the coffee filter flower and modified it to fewer cupcake liners and coffee filters to make it easier for the kids.
Gather your supplies:
  • Chef's Hat
  • 6 coffee filters
  • 3 regular sized cupcake liners 
  • 1 mini cupcake liner
  • 1 Button
  • Plain old school glue

Directions:
  • Glue together two coffee filters, turning the second upside down on top of the first
  • Glue a third coffee filter correct side upon top of the others... this creates a more fluffy flower bottom.  Let this dry, if possible.
  • Fold the last three coffee filters in half and then half again, creating pie shaped pieces.
  • Glue the three coffee filters on the flower bottom 
  • Fold three cupcake liners in half and then half again, making pie shaped pieces.
  • Glue cupcake liners on top of coffee filters. 
  • Glue the mini cupcake liner on top of the others. 
  • Glue a button into the middle of the flower 
  • Glue the entire flower onto the front of the chef's hat. 
  • Embellish otherwise, we had the kids add their names to the front with name stickers (photos to come soon).
  • Size the hat to the child's head and staple the back... enjoy!

Monday, March 21, 2011

St. Patty's Day: Green Eggs and Ham Lunch

So, my fabulous friend Brooke (who needs to update her blog with this!) invited my girls and I over for a Green Eggs and Ham lunch on St. Patrick's Day... and since I am behind on my blogging, I thought I would post it now before I forget and it never makes its way onto the blog.  Really, that would be a shame too because it was SO darned cute and a perfect St. Patrick's Day theme :-)

Here was the adorable plateing...


Thanks again for lunch, Brooke!  The kids had so much fun!  Can we do it again next year?

And, how perfect would this be for Dr. Seus's Birthday??
Related Posts Plugin for WordPress, Blogger...