I am trying to decide which fall decorations I *NEED* to make.
This one is at the top of my list. Danielle Thompson over at Thompson Family-Life has a really great tutorial for making them... and they don't look all that hard!
Although I love her take with the suprising, non-traditional, vintage-y fabrics... I think I will try finding some more traditional fall fabrics for mine. I am hoping mine come out as cute as hers!
Thursday, October 7, 2010
Tuesday, October 5, 2010
4x4 Wooden Pumpkins|Fall Inspiration
One of the reasons I wanted to start this blog was to be able to keep some of the ideas and inspiration I find all over the web in one place. I happened to see this cute and easy 4x4 pumpkins over at Crafts ReDesigned .
4x4 wood posts, cut to different lengths, and painted orange.
Distressed slightly.
Add wood as the stems and rafia.
So cute.
4x4 wood posts, cut to different lengths, and painted orange.
Distressed slightly.
Add wood as the stems and rafia.
So cute.
Monday, September 27, 2010
iLoveToCreate: Decoupaged Fabric Canvases
As part of my oldest daughter's room revamp, my husband and I created these fabric-covered canvases for her wall. It ended up being sort of Andy Warhol-esque, and I am so happy with how it all turned out and looks on her freshly painted walls!
I started by gathering some supplies...
*fabric that coordinated with her room colors
*4 - 11x14 art canvases from Michaels
*a few foam paint brushes and some paper cups
*I also used a rotary cutter and cutting mat, however you could also use fabric scissors
***(not pictured) stencils of desired artwork, pencil, thin paint brush, and latex paint
Lay out the fabric and canvas, cut a rectangle of fabric larger than the canvas by a few inches. This doesn't need to be precise (I used the rotary cutter), the edges will not be seen on the back.
I grabbed my bottle of Collage Pauge decoupage. In this case I used the matte finish. If you have never used a decoupage product, it is a glue, sealer, and finishing top-coat all in one. Very cool. Very addicting. I find myself looking for items to decoupage. Just saying... you might be seeing a few more projects featured on the blog using this product in the near future.
Paint a generous coat of the decoupage directly onto the canvas.
Place the fabric on top of the decoupaged canvas. Smooth out any wrinkles or bubbles. This product has a tendancy to bubble up, so be aware and smooth out accordingly.
Paint another generous coat (or two) of the decoupage directly on top of the fabric.
Cut in from the corners of the extra fabric to the outer edge of the canvas, then cut straight up the sides. Basically, you need a square cut out from each corner in order to decoupage the fabric to the sides of the canvas.
Gently flip the fabric back and paint the edge of the canvas with the decopauge. Flip the fabric back down and smooth by pulling it tightly around the edge. Seal with another coat of decoupage over the fabric. Repeat around all four sides of the canvas, and then again to the back of the canvas.
*I usually get my fingers pretty sticky at this point. I found that by pulling and smoothing the fabric as tighly as I could around the edges and back I prevented as many wrinkles and bubbles as possible.
Wait until all fabric-covered canvases are dry. I waited at least 24 hours before moving onto the next step.
Find a stencil or object(s) you would like to use as your artwork and trace it onto the dry canvases.
A few shots of the finished products...
And finally, proudly displayed on the wall. Lovingly refered to as 'the Birds' :)
Sunday, September 26, 2010
Flash-Frozen Plums
We have done a good job this summer of taking advantage of the wonderful produce that has been available. We have made a ton of fruit salads, but we have also made an effort to freeze a lot of fruit for later use in smoothies.
In order to keep fruit from sticking together when you freeze it, you are supposed to 'flash freeze' it on cookie sheets for an hour or two and then put it in ziploc-style bags for future use. It is as easy as it looks... just rinse and cut your fruit, then space it out on a cookie sheet and freeze.
[Side note: always label the bags of fruit with what they are and the date they were frozen. Sometimes it is hard to tell how long something has been in the freezer.]
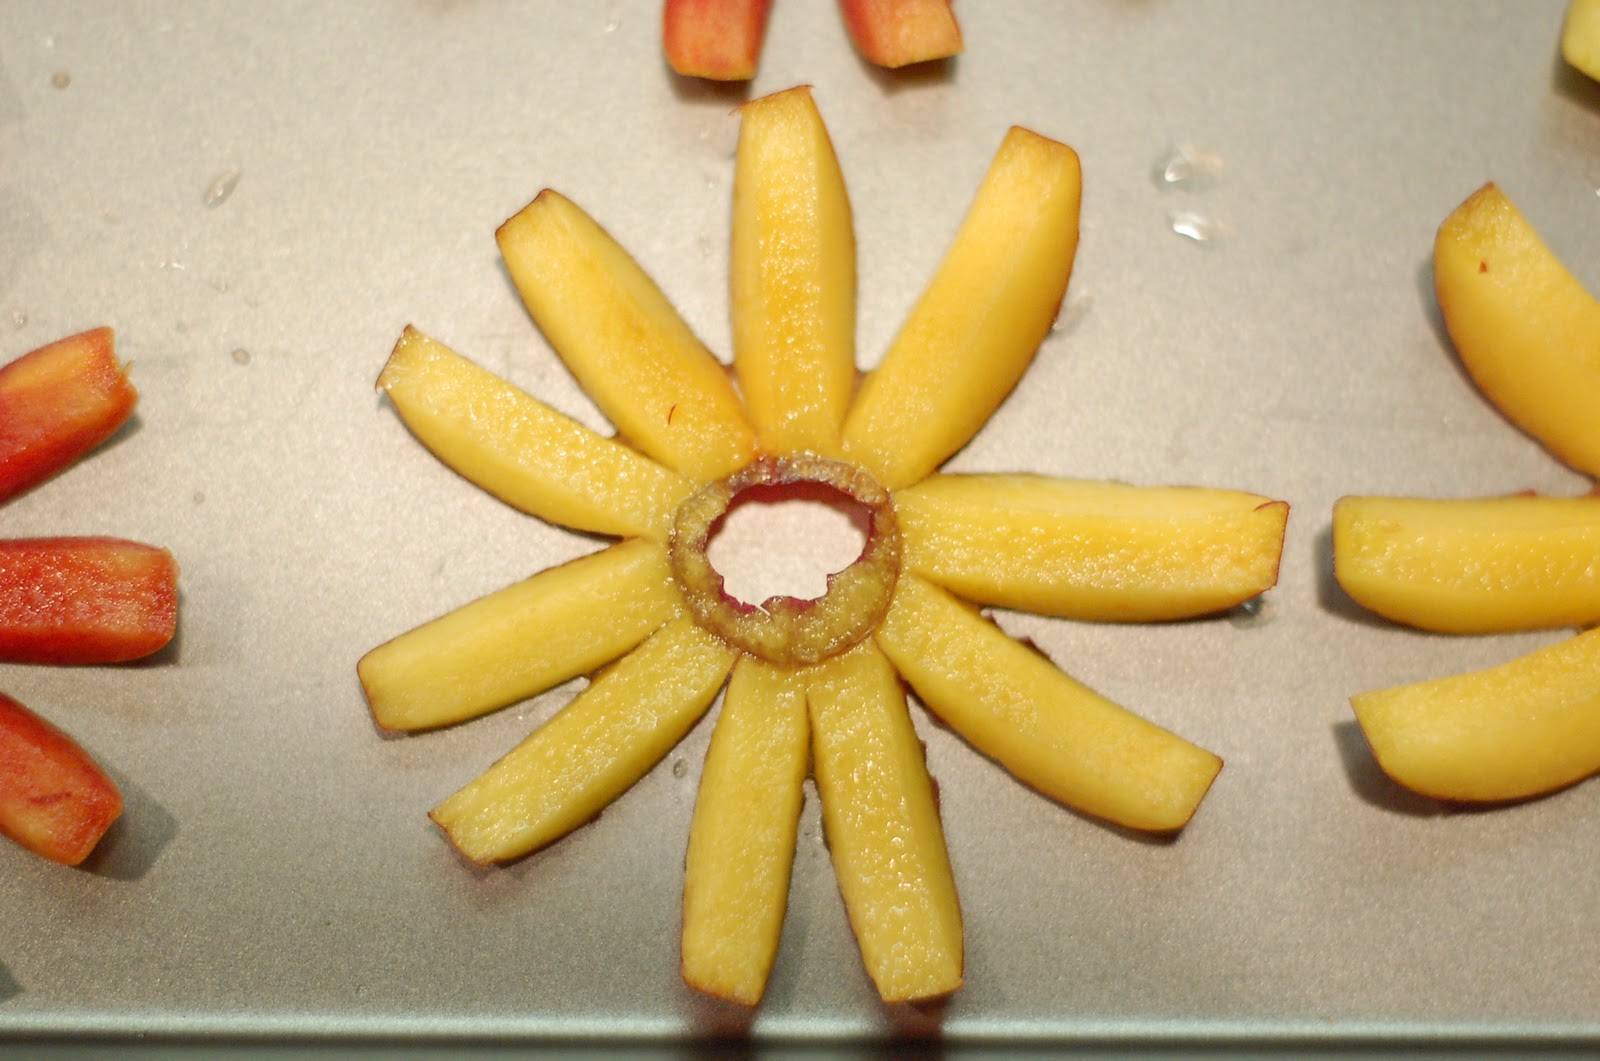
We got a whole box of great plums a few weeks ago and were not going to be able to eat them all before they went bad. John thought it would be a good idea to use the apple wedger to cut them. When he did, they didn't cut all the way through. We were left with great flower of plum which looked really neat on the cookie sheets... so of course I had to snap a few photos. =)
Sunday, September 12, 2010
iLoveToCreate: Tie-Dye techniques class
I am not one to pass up an opportunity to learn new techniques for fun crafts. A month (or so) ago, I was invited to attend a tie-dye class put on by the iLoveToCreate team! I just supplied my own item to dye and used a Tye-dye kit that I had received as part of a give away.
We all layed our kits and items to die out on the table. Here are a few pointers...
A kit is a great way to get most of the supplies you will need: Bottles of powder dye (just add water), Gloves, Rubber Bands, Idea sheet and instructions
A tie-dye kit will make multiple items, there are a variety of items you could create: T-shirts, tanks, dresses, pants, skirts, shorts, swim cover or towels, etc.!
You should plan on having a few extra supplies on hand: Gallon sized plastic bags (Ziploc style); cover or tablecloth to cover your work surface; Apron; Water to dampen items before dyeing
There are a few different techniques we learned about. Here is what I will call the "scrunching" method. (I have no idea what it is really supposed to be called.) Literally, just lay the shirt flat, then SCRUNCH it into a wrinkly little ball by pinching it together in various areas.
Then just squeeze on the dye.
This is more of a "traditional" dyeing technique. Squeeze the shirt into a long snake, tie a number of rubber bands around it tightly.
Use the bottles of dye and squeeze liberally onto the untied portion of the shirt.
Whenever an item is done, place it in a plastic bag. The dye needs to soak for a whole day before being rinsed.
Here is one of the finished, rinsed, and washed shirts I made using a basic tie dye method. I think it came out cute, although next time I will soak it with a little more dye and maybe let it set for 48 hours to make sure the colors stay a little more vibrant.
This is called "Shibori"
You take the item to be dyed and lay it onto a large cardboard tube. Roll the fabric up, around the tube.
Once the item is all rolled around the tube, scrunch the fabric together pushing from the outside in.
For this technique, you need to add your dye to a spray bottle. Spray the dye onto the scrunched fabric.
You will have to gently unroll the item and make sure the sprayed dye is soaking into the fabric. You may have to take the item off the tube and roll it again on the other side.
Pretty cool effect, huh?!!?
These are the great little bottles that come with the tie-dye kits. Save these! You might be able to use them for your next tie-dye project!!!
Tuesday, September 7, 2010
John's Project: Antique Wheel Light
Sometimes it is funny how things work out. John had been looking for an old wheel to make into a light fixture for a few weeks, however eBay + shipping was not quite going to fit into our budget. One Saturday we went yard sale shopping and he happened to find this 1930's Ford wheel. The owner had already sold the other 4 for a pretty penny, but he found this one afterward and was looking to get rid of it for the bargain price of $5!! [I didn't get a before photo, but it was covered in rust.]
To remove the rust, John soaked the wheel in 'Evapo-rust' (found at a harware store) for a few hours. He then sealed it with some spray clear coat to prevent any future rust.
He found a round light fixture ($10 at Home Depot) that fit perfectly into the middle of the wheel and secured it with some angle aluminum.
Finally, he cut a piece of textured plastic board to fit the inside of the wheel which diffuses the light slightly and gives a great finishing touch!
Voila! A beautiful antique wheel repurposed into a creative lighting fixture. It now rests (bolted!) on our bedroom plant ledge.
Wednesday, July 28, 2010
Magnetic Stand, last year's Christmas project
Last December John and I spent a week making 12 of these nifty little guys to give as gifts to family and friends.
Aren't they cute?
We followed the tutorial here on Shanty2Chic, which has become one of my favorite crafting blogs. We followed pretty much EXACTLY what she did and found everything to be fairly easy except the part where you cut the roofing tin... which was a little more involved than just measuring and cutting. (Check out the tutorial to see what I mean.)
I sent many of them out with a recipe card attached so you could use it in your kitchen as a recipe holder, but I have been using ours as a photo display.
One of my friends attached a monogram letter to the center and has it displayed in her living area, and another has used it to display some inspiration she found in a magazine. So many GREAT ideas!
A friend and I made another similar project from the Shanty2Chic blog, which I will be sharing another day.
Subscribe to:
Posts (Atom)