Showing posts with label decoupage. Show all posts

Wednesday, February 8, 2012

iLoveToCreate: $1 Michaels Heart Frame Chalkboard

This is a super simple Valentine's Day project that is easy on the wallet as well.  This would make a great gift for a teacher, gradparent, or friend.  It is also a great little project for decor in your own home!

 Supplies:
Remove the center cardboard shape from your frame and SAVE for a little later.  Trace your entire frame onto the scrapbook paper and cut out; line up the frame and trace the inside shape and cut out.

Use the foam brush to paint on a layer of Collage Pauge directly on both the frame and the back of the scrapbook paper, work quickly to adhere the paper to the frame.  Sand all the edges to make sure the scrapbook paper is not coming over the edges and it all looks even.
Use a stamp pad or some stain aroud the edges of the whole frame and the inside shape.  Paint on several more layers of Collage Pauge and allow to dry completely.
Paint the inside cardboard shape with several layers of chalkboard paint.  (I think I used about 6 layers of paint to get the look I wanted)  Let the shape dry completely.
Turn over the frame and add a thin line of Aleene's Quick Dry Tacky Glue to the inside rim where the chalkboard painted heart will go.
 Insert the heart shape and allow the glue to dry completely before using the chalkboard.
 Display in a plate holder or easel.

Wednesday, February 9, 2011

iLoveToCreate: Love/Luck Reversable Blocks


These blocks are great!  Two holidays in one decoration!

One side says Love... 
and the other Luck.  Yes, those are the same blocks!  Basically, three sides of each are devoted to each holiday... and I am going to do my best to explain how to make a set of your own.

Supplies needed:
  • Four wooden blocks (mine are a fence post cut down to 3.5/3.5 squares) sanded down
  • Collage Pauge decopauge and a foam paintbrush to apply
  • Decorative scrapbook paper, three Valentine's patterns and three St. Patrick's patterns.  Cut paper to the size of the blocks - four of each pattern
  • Cut-out letters, either paper or vinyl - I cut white cardstock using my Silouette machine
Follow the diagrams below to figure the best way to arrange the paper...
I did my Valentine's paper first, applied my collage pauge and let it dry, then turned the blocks upside down to figure the best way to do the St. Patricks Day paper.  [The words for the opposite holiday will be upside down and not in the same order.  If you get to this point, you will understand.] 
It is very important to plan exactly where the paper will go!

I wanted to make sure I could see the proper holiday's color when the blocks were both set out four across (as above), and when they were set up on top of each other (as shown below).


  • Once I figured out where the paper was going to go, I painted a layer of the Collage Pauge onto the block and another onto the back of the paper then stuck them together and smoothed the paper out.  I have found this to be the best way to do Collage Pauge to avoid bubbles under the paper.
  • Repeat until all six sides of each block have been Collage Pauged...
  • Sand the corners and edges of the blocks with an electric sander. 
  • Distress the corners and edges with some distress ink or wood stain. 
  • Add another few coats of Collage Pauge to each block, allowing time to dry between each coat.
  • Voila!  Cute block decor for two different holidays!! 

Tuesday, January 25, 2011

iLoveToCreate: Christmas "PEACE" decor


I did get a chance this past fall to get a few Christmas projects done.  This PEACE sign was a 'use what you've got' project.  My friend was having a craft day, and had a number of these wooden plaques available.  I had just gotten a Sillouette machine and was going to try to use it.  I have the paint, vinyl, Christmas paper, and Collage Pauge on hand... and I got the fabulous hinges at ReStore (more on this later)!  Voila!  Cute Christmas decor!

1. Paint wooden plaques and hinges
2. Collage Pauge Chirstmas paper onto plaques.
3. Choose font and size and cut out the letters for 'PEACE'
4. Stick on vinyl letters and seal with Collage Pauge
5. Once dry, attach at the back with hinges.

Tuesday, January 18, 2011

LOVE letters | Valentine's Day Inspiration

I found these at iheartnaptime sometime during the summer and have been wanting to make them ever since.  What's great about Valentine's Day decor is that it can really be used anytime of the year, especially since these aren't completely pink and red!  

I know what your thinking... and yes, I do realize that this would be another Collage Pauge project... I am telling you, I'M OBSESSED!! 

project and photo from iheartnaptime

I am going to be looking for more Valentine's Day inspiration, I think all of my Valentine's decor fits into a plastic grocery bag.  Sad!  If you have any ideas, for fun Valentine's decor shoot me a comment, I am looking to get crafty this week!!

Wednesday, January 12, 2011

iLoveToCreate: The letter 'H', wrapped canvas project


Happy New Year!   I am finally back to business on blogging and am ready to get up to date on the projects completed (or started) in 2010 and move on to new projects this year!  Thank you to anyone that has been checking regularly to see if I have posted anything new... I will do my best to get a few posts up per week.  I am excited to see where this blog will be by the end of 2011!

I am not exactly sure what to call this project.  I found a cardboard letter 'H' on clearence at Michael's and knew that it would work somewhere in my daughter Hannah's room.  It wasn't all that large so I was hoping that I could think of something to give it a little pizzaz.  The final product reminds me of a giant rubber stamp or old-style newsprint letter.  Either way, I was happy with the outcome :)

As I have mentioned before, Collage Pauge is my friend.  If I am not careful my walls will someday be entirely covered in this stuff... and I am only a little bit kidding... ;)

So, for this project I used:
  •  Matte-finish Collage Pauge
  • an 8x10 canvas
  • two complimentary colors of fabric
  • Cardboard letter H
  • Foam brushes
  • rotary fabric cutter

I cut one of my fabrics a few inches larger than my canvas.


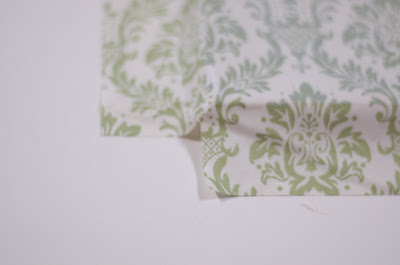
Than I cut out the corners, making sure to leave enough fabric to cover the corners of the canvas. 


Using a foam brush, paint the front of the canvas liberally with Collage Pauge (CP),  line up the fabric and place it over the top, smoothing it out the best you can.  Paint another layer of Collage Pauge (CP) over the top. 
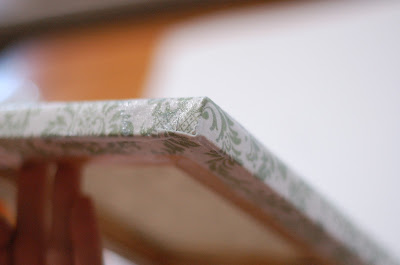
Starting at one edge, paint on the Coallge Pauge (CP) and pull the fabric over the edge adding another layer of CP over the top. Work you way around the edges and back of the whole canvas. 


This is what my edges looked like....


For the letter H, I cut the fabric large, but had to get creative and do another layer of fabric over the top as there was not enough to cover all of the brown cardboard.  Does that make sense?  Use the CP in a similar manner as above, doing the front first and working out to the edges and back, pulling the fabric smooth, and painting the CP over the top.
So, there were two layers of fabric over this H.  If I were mass producing these I would try to find another way, but for my decorative purposes it worked out well. 


And, the final product!  After both pieces had dried I used some Aleene's Original Tacky Glue to adhere the H to the canvas.
Here is the final product, displayed on a frame easel in my daughter's very purple room! 


Monday, September 27, 2010

iLoveToCreate: Decoupaged Fabric Canvases


As part of my oldest daughter's room revamp, my husband and I created these fabric-covered canvases for her wall.  It ended up being sort of Andy Warhol-esque, and I am so happy with how it all turned out and looks on her freshly painted walls!


I started by gathering some supplies...
*fabric that coordinated with her room colors 
*4 - 11x14 art canvases from Michaels
*a few foam paint brushes and some paper cups
*I also used a rotary cutter and cutting mat, however you could also use fabric scissors
***(not pictured) stencils of desired artwork, pencil, thin paint brush, and latex paint


Lay out the fabric and canvas, cut a rectangle of fabric larger than the canvas by a few inches.  This doesn't need to be precise (I used the rotary cutter), the edges will not be seen on the back.


 I grabbed my bottle of Collage Pauge decoupage.  In this case I used the matte finish.  If you have never used a decoupage product, it is a glue, sealer, and finishing top-coat all in one. Very cool.  Very addicting.  I find myself looking for items to decoupage.  Just saying... you might be seeing a few more projects featured on the blog using this product in the near future. 
Paint a generous coat of the decoupage directly onto the canvas.

 Place the fabric on top of the decoupaged canvas.  Smooth out any wrinkles or bubbles.  This product has a tendancy to bubble up, so be aware and smooth out accordingly.

Paint another generous coat (or two) of the decoupage directly on top of the fabric. 

Cut in from the corners of the extra fabric to the outer edge of the canvas, then cut straight up the sides.  Basically, you need a square cut out from each corner in order to decoupage the fabric to the sides of the canvas.

Gently flip the fabric back and paint the edge of the canvas with the decopauge.  Flip the fabric back down and smooth by pulling it tightly around the edge.  Seal with another coat of decoupage over the fabric.  Repeat around all four sides of the canvas, and then again to the back of the canvas.
*I usually get my fingers pretty sticky at this point.  I found that by pulling and smoothing the fabric as tighly as I could around the edges and back I prevented as many wrinkles and bubbles as possible.


Wait until all fabric-covered canvases are dry.  I waited at least 24 hours before moving onto the next step.

Find a stencil or object(s) you would like to use as your artwork and trace it onto the dry canvases. 

 Take a small paintbrush and paint in the traced lines.  I found that using latex paint worked far better than using acrylic paint.  Also, the decoupage made a great surface for the paint.  No bleeding over the lines!


A few shots of the finished products...


And finally, proudly displayed on the wall.  Lovingly refered to as 'the Birds' :)


Related Posts Plugin for WordPress, Blogger...