Showing posts with label fabric paint. Show all posts

Sunday, August 14, 2011

iLoveToCreate: Reverse-Stencilled & Spray-Painted Shirt

This is a great, fairly easy way to uniquely personalize a shirt!  My friend Brooke, co-owner of the fabulous Uptown Kids sale (a twice yearly consignment event held here in Fresno), came up with this idea and I have to say it seems to have worked out well!

First she decided that she wanted to rock a fun and unique shirt with her business initials... UPTK.

Supplies:
Tank top style shirt (or anything you would like personalized)
Tulip brand fabric spray paint (your could use several colors if that suits your fancy)
Vinyl - cut using the Silhouette machine
  • Choose a font and size that will work well for the letters of your shirt, then cut out your vinyl using your Slihouette, Cricut, or trace and cut with scissors.
  • Peel letters out of vinyl and place on your shirt


  • Cover your work area and spray fabric paint liberally around the stuck-on letters and around shirt until you have the desired effect
  • Peel off vinyl lettering and enjoy your creation!


Thoughts:
  • Wouldn't this be a great craft for a kids party or camp? 
  • I thought the spray paint gave the shirt a cool effect and you could have a variety of outcomes depending on the amount of spray you want to use.
  • The vinyl worked really well and provided nice crisp lines... no bleeding paint!!
  • Add some spray glitter for a little more pizzaz!
**Thanks for sharing your idea Brooke!  I'm sure you will enjoy wearing it at this fall's consignment sale!!**


Friday, March 11, 2011

iLoveToCreate: Fabric-Covered and Stenciled Bulletin Boards

I am a chronic clearance shopper.  Sometimes it is a good thing, and sometimes it leads to excess 'stuff' in our house.  These bulletin boards, found in a clearance bin for $2.50 a piece, have been laying around my house for a few years.  I knew they would eventually go well in the office or one of the girl's rooms, but I was never entirely motivated to get the hung up. I am kind of glad I didn't because the colors don't really go with anything and recently I actually had some inspiration on what to do with them.

I took some of the fabric I had bought to accessorize Hannah's room and went to work covering each of the four bulletin boards.  I just cut the fabric and hot glued it to the back, pulling tight.
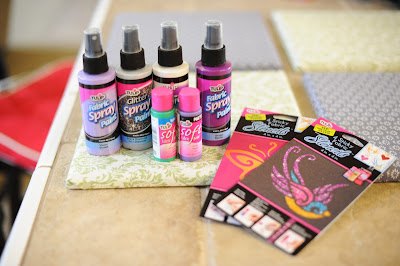
I raided my stash of iLoveToCreate products.  I knew I wanted to use a different Tulip Sticky Fabric Stencil in each of the boards, and I didn't want everything to be too 'matchy' to I got out a variety of fabric paint options.
I am a big fan of the sticky fabric stencils.  They are peel and stick, and they seem to re-stick pretty well.  I started with the bird in one of the corners.
I used Tulip Fabric Spray Paint for the bird.  I just added some paper towels around the sides to make sure the overspray didn't get on the fabric.
On the butterfly I used a sponge and applied some Tulip Soft Fabric Paint and then added some Tulip Fashion Glitter while the stencil was still on.
On the next one I did a purple butterfly, and opted for the Tulip Glitter Spray Paint to glam it up a bit. 
When all the boards had been stenciled, I added a little bling with some Tulip Heat Set Crystals and Tulip Heat Set Tool.
Once everything was dry, we hung them on the wall...
...and started adding photos!  I just did a few, because I want Hannah to be able to add the things she loves.
This was a very functional project, but my Husband pointed out that it kind of matched the Decopauged Fabric Canvases I made a few months ago.  I think they will have their own look once they are completely covered in photos and artwork.  I think I will also try to add a heading above them in vinyl or something.  Do you have any ideas to give it a little pizzaz?

Related Posts Plugin for WordPress, Blogger...