Showing posts with label home decor. Show all posts

Tuesday, June 18, 2013

Pallet Wine Rack: Home Decor

This project was a case of seeing something at a flea market and deciding that we could make it exactly how we wanted it for quite a bit less money.  I am really so glad we did... because I am so thrilled with the outcome of this little project!!

We found a great sized pallet at ReStore, John took it apart, and to design it we found some ideas on Pinterest and altered them based on our wall space.  A little sanding, stain, and stenciling and voila!
Confession: I went out and bought some new wine glasses to fit in the bottom because all of ours were too big or mismatched.  I did, however, already have the wine on hand and am happy to have a new place to display it!

Tuesday, August 7, 2012

New Thrifting Love | Pyrex

John and I are big mid-centrury fans.  Thiere is something just fun about mixing pieces from the 1940's-60's in with our decor. 

I also love thrifting, yard/estate sale browsing, and generally finding things for amazing deals (who doesn't??). 

But my newest love is vintage Pyrex. 

I am just loving that many of these pieces are over 50 years old and still look BRAND NEW.  I also LOVE the patterns and colors that were popular in the 50's and 60's... just so FUN!


So, of course, it would follow suit that I would become a blogger at the super-cool blog The Pyrex Collective III.  Check it out for some awesome eye candy and amazing vintage pieces!

Wednesday, August 1, 2012

Record Display | Home Decor

I truly have a wonderfully talented Husband!

I need to share every last one of his projects/restorations because he is awesome at thinking up these things and then making them a reality.

A few weeks ago we picked up these old Disney record sleeves at a yard sale for $2 (they were just the sleeves, no records included).  I had an idea awhile ago to collect records for Claire's wall, but had never really pushed the idea because I had no idea how we would put them on the wall... frame?  ...shelf with ledge?? 

So when we found these, John was officially motivated to get something up on her HUGE green empty wall. 

Basically, he split a 2x4 and made a frame, then covered the frame with moulding! The record sleeves just lean up against the wall and could be rearranged if we wanted.

Claire's room has been a slow-to-come-together project.  As far as decor goes, that seems to be my MO... I don't like to commit to a decoration unless I LOVE it.  Until then, things are a bit of a hodge-podge. 

It's definitely getting to a point where her room makes me smile :-)

Tuesday, February 14, 2012

Valentine Banner: Simple Projects


This was super simple...(the Valentine banner hanging from the shelf)
I found a few packages of colorful tags at Michael's for $1 per pack of 12. 
Add some red letters and jute twine and make a simple, yet super cute Valentine banner!


Wednesday, February 8, 2012

iLoveToCreate: $1 Michaels Heart Frame Chalkboard

This is a super simple Valentine's Day project that is easy on the wallet as well.  This would make a great gift for a teacher, gradparent, or friend.  It is also a great little project for decor in your own home!

 Supplies:
Remove the center cardboard shape from your frame and SAVE for a little later.  Trace your entire frame onto the scrapbook paper and cut out; line up the frame and trace the inside shape and cut out.

Use the foam brush to paint on a layer of Collage Pauge directly on both the frame and the back of the scrapbook paper, work quickly to adhere the paper to the frame.  Sand all the edges to make sure the scrapbook paper is not coming over the edges and it all looks even.
Use a stamp pad or some stain aroud the edges of the whole frame and the inside shape.  Paint on several more layers of Collage Pauge and allow to dry completely.
Paint the inside cardboard shape with several layers of chalkboard paint.  (I think I used about 6 layers of paint to get the look I wanted)  Let the shape dry completely.
Turn over the frame and add a thin line of Aleene's Quick Dry Tacky Glue to the inside rim where the chalkboard painted heart will go.
 Insert the heart shape and allow the glue to dry completely before using the chalkboard.
 Display in a plate holder or easel.

Tuesday, February 7, 2012

Fabulous Finds: Scales

A few fabulous finds over the past few months!

I have been on the lookout for reasonably priced scales for awhile.  I was planning on using them for decoration, but some of the prices on Etsy were a bit high (in my opinion). 

I was up in Coarsgold (a small community on the way to Yosemite) doing a photo session and stopped at a side of the road antiques/junk sale and found this beauty... $5!!  It doesn't exactly work properly, but it has the look I was going for, so I was happy.  John actually painted the top and dial a oil-rubbed bronze color and cleaned up the face a little...perfect!
This scale was found (by John) in an antique store in Oakurst (another small community in the same area) for $28... we had seen some similar on eBay and Etsy for anywhere from $50-$200 so I was so excited by this find!  This one really does work and looks great in our kitchen.  We use it to weigh the produce we have gotten from our citrus trees this winter. 

You never know what you can find and where... plus having a hubby that travels daily has it's perks ;-)

Tuesday, October 4, 2011

Fall Inspiration: Button Pumpkin

I'd like to thank the ever addicting Pintrest and a crazy beginning to photography season for yet another lull in posts. 

Fall has found us... today was our first day with a temperature lower than 80 in awhile and I was so happy to see the cloud cover that I went out and bought a box of chi tea to celebrate! 

Right now I am contemplating if I have enough various orange buttons to make this sweet little fall craft.  Check it out over at Auntie Lolo Crafts.

Wednesday, August 17, 2011

iLoveToCreate: Repurposed Fabric Covered Bulletin Board


Poor Claire, my youngest daughter, has had bare walls for quite some time.  It's not for lack of thought or intention, it is just that I kind of have a phobia when it comes to decorating.  I want to LOVE what I put on my walls... for goodness sake, I will have to look at it EVERYDAY!  It has always seemed like a lot of pressure.  Pretty much the only reason things get put on walls around here is if John harps on me enough to get it ready, then he will hang it.

As was the case with this easy project! 

We like to call this our $1 Bulletin Board.  We spent a wopping $1 on the frame and had everything else on hand.  It was a great way to repurpose an old cork bulletin board as well. 

Supplies: 
  • Frame - Ours was found at ReStore (it has a chip in the back was a gaudy gold color, so John painted it black...you can't even see the chip when it is on the wall!)
  • Corkboard - We had an old board that was actually in our yard sale pile... John cut out the middle section to a size that would fit inside the frame with a utility knife
  • Fabric - enough to cover the board with a few inches extra on all sides
  • Stapler - Regular old office one, the staples in a staple gun would have gone through the cork
  • Hanging hooks, grabbers, fastening clips, or whatever you like to use to hang the final product (find at any hardware store)


  • Decide on your frame size and cut corkboard to fit inside the frame
  • Measure enough fabric to cover the corkboard, plus a few inches on each side.  Iron the fabric and place it wrong side up on your work surface

  • Go outside and spray the good side of the corkboard with Aleene's Tacky Spray
  • Quickly place the sticky side of the corkboard onto the wrong side up fabric
  • Start on one side pulling the fabric taught and stapling it down on the back of the coarkboard, work your way around until it is all stapled
  • **I also flipped the corkboard over and  placed a large, flat tray or book on the right side to make sure the fabric sticks to the cork, I left this for about 30 minutes to dry

  • Place covered corkboard into frame, we made sure ours stayed tight with fastening clips
  • Add picture hanging hardware and hang on the wall... (John did this part)

...and the final product!  Almost too pretty to add her treasured photos and memories :-)


Monday, August 15, 2011

Rearranged China Cabinet | Home Decor Project

When we were in the process of buying our house, this china cabinet was one of the selling points to me.  It was a built-in piece of furniture and was a convenient storage spot.  Score!

Not so much.

Fast forward six years and I was completely lost when it came to the decor of the china cabinet.  Every time I passed it, I wanted to throw out its contents and start again.  It had become a catch-all for items I didn't want to get broken... not the beautiful display I had once envisioned. 

See... such a hodge podge!

So, one day a few weeks ago I enlisted the help of a friend (Thanks Brooke!) and we got to work.  We used only items I had on hand and rearranged everything in a more cohesive way. 

This is basically a post to (a) thank my sweet friend for her help and (b) remember the way we displayed everything in case I need to use or clean the contents. :-)


Friday, March 11, 2011

iLoveToCreate: Fabric-Covered and Stenciled Bulletin Boards

I am a chronic clearance shopper.  Sometimes it is a good thing, and sometimes it leads to excess 'stuff' in our house.  These bulletin boards, found in a clearance bin for $2.50 a piece, have been laying around my house for a few years.  I knew they would eventually go well in the office or one of the girl's rooms, but I was never entirely motivated to get the hung up. I am kind of glad I didn't because the colors don't really go with anything and recently I actually had some inspiration on what to do with them.

I took some of the fabric I had bought to accessorize Hannah's room and went to work covering each of the four bulletin boards.  I just cut the fabric and hot glued it to the back, pulling tight.
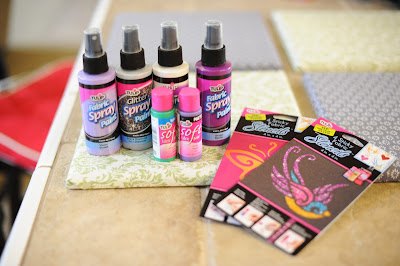
I raided my stash of iLoveToCreate products.  I knew I wanted to use a different Tulip Sticky Fabric Stencil in each of the boards, and I didn't want everything to be too 'matchy' to I got out a variety of fabric paint options.
I am a big fan of the sticky fabric stencils.  They are peel and stick, and they seem to re-stick pretty well.  I started with the bird in one of the corners.
I used Tulip Fabric Spray Paint for the bird.  I just added some paper towels around the sides to make sure the overspray didn't get on the fabric.
On the butterfly I used a sponge and applied some Tulip Soft Fabric Paint and then added some Tulip Fashion Glitter while the stencil was still on.
On the next one I did a purple butterfly, and opted for the Tulip Glitter Spray Paint to glam it up a bit. 
When all the boards had been stenciled, I added a little bling with some Tulip Heat Set Crystals and Tulip Heat Set Tool.
Once everything was dry, we hung them on the wall...
...and started adding photos!  I just did a few, because I want Hannah to be able to add the things she loves.
This was a very functional project, but my Husband pointed out that it kind of matched the Decopauged Fabric Canvases I made a few months ago.  I think they will have their own look once they are completely covered in photos and artwork.  I think I will also try to add a heading above them in vinyl or something.  Do you have any ideas to give it a little pizzaz?

Tuesday, March 8, 2011

Monday, March 7, 2011

Frame Collage | Home Decor Inspiration

I am gathering inspiration for a wall project... I like the advise here from Lemon Tree Creations however I think I need to convince John.  I don't think he appreciates the fun in the empty frames.  :)

(photo found at Lemon Tree Creations)

Sunday, March 6, 2011

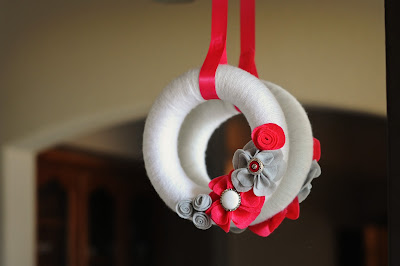
Yarn Wreath with Felt Flowers #2 | Bedroom Decor

This is a sequel to the Yarn Wreath with Felt Flowers I blogged about a few weeks ago.  I think I mentioned in that post that I was planning on making one of these for every room in the house.  I am well on my way!

This one was made for my oldest daughter, Hannah's room.  I need to take some photos of her room, it is VERY purple, so this goes well.  I hung it on her door and she loves it.  My youngest daughter has been begging me to finish hers.

These flowers were made by following the tutorial here at Mrs. Priss.  They make me smile :-)
I like giving the cost breakdown so you can have an idea what you are getting into if you would like to make one for yourself.
  • Wreath $1 - Dollar Tree (I haven't seen them at every store) or Wal Mart, JoAnns, Michaels for $4-$5
  • Yarn $2-$3 - WalMart
  • Felt $0.39/sheet - Michael's or JoAnn's
  • Hot Glue for felt flowers (had at home)
  • Straight Pins - $2 at WalMart

Friday, March 4, 2011

L.O.V.E. Sign | Valentine's Day Decor

Yes, Valentine's Day is over, but I needed to post this before next V-Day comes around ;-)


I found the letters on sale at JoAnn's (about $1 each) and thought I might Collage Pauge some paper on them, but as ideas sometimes go... this one took another direction. 

I found:
  • a board of wainscoating for $0.50 at ReStore (our FAVORITE store right now)
  • a strip of moulding from Lowe's (around $8)
I explained my new Idea to John and he painted the wainscoating, cut and painted the moulding, and glued it together using moulding glue.

I placed and glued the letters and badda-BING!

I just wish I had gotten it done BEFORE Valentine's Day this year!!


Friday, February 11, 2011

Yarn Wreath with Felt Flowers - #1 | Valentine's Day Decor

I decided to try another project I found in the blog world and am now officially addicted!  I am not joking when I say that I am making one of these for every room in my house. 

Here was attempt number one, sort of Valentine's Day inspired. 

Check out the tutorial for the Cheery Yarn Wreath at Mrs Priss


Wednesday, February 9, 2011

iLoveToCreate: Love/Luck Reversable Blocks


These blocks are great!  Two holidays in one decoration!

One side says Love... 
and the other Luck.  Yes, those are the same blocks!  Basically, three sides of each are devoted to each holiday... and I am going to do my best to explain how to make a set of your own.

Supplies needed:
  • Four wooden blocks (mine are a fence post cut down to 3.5/3.5 squares) sanded down
  • Collage Pauge decopauge and a foam paintbrush to apply
  • Decorative scrapbook paper, three Valentine's patterns and three St. Patrick's patterns.  Cut paper to the size of the blocks - four of each pattern
  • Cut-out letters, either paper or vinyl - I cut white cardstock using my Silouette machine
Follow the diagrams below to figure the best way to arrange the paper...
I did my Valentine's paper first, applied my collage pauge and let it dry, then turned the blocks upside down to figure the best way to do the St. Patricks Day paper.  [The words for the opposite holiday will be upside down and not in the same order.  If you get to this point, you will understand.] 
It is very important to plan exactly where the paper will go!

I wanted to make sure I could see the proper holiday's color when the blocks were both set out four across (as above), and when they were set up on top of each other (as shown below).


  • Once I figured out where the paper was going to go, I painted a layer of the Collage Pauge onto the block and another onto the back of the paper then stuck them together and smoothed the paper out.  I have found this to be the best way to do Collage Pauge to avoid bubbles under the paper.
  • Repeat until all six sides of each block have been Collage Pauged...
  • Sand the corners and edges of the blocks with an electric sander. 
  • Distress the corners and edges with some distress ink or wood stain. 
  • Add another few coats of Collage Pauge to each block, allowing time to dry between each coat.
  • Voila!  Cute block decor for two different holidays!! 
Related Posts Plugin for WordPress, Blogger...